Difference between revisions of "VPN"
(Dissecting the enormous Linux@WUR.) |
(Removal of VLAN option, since that is not available any more) |
||
| (One intermediate revision by one other user not shown) | |||
| Line 1: | Line 1: | ||
| − | == | + | == Using the VPN == |
| − | If you need access to your computer at the university | + | If you need access to your computer at the university: in the past, it was possible to get a public VLAN address for university computers, but now that no longer seems to be an option. |
| − | + | The recommended way to do so is to use VPN access. There are two clients for the VPN hardware in use at the university: a client from Cisco, and a native client called 'vpnc'. The native vpnc client is standard available in Debian Sid (apt-get install vpnc), I cannot say for other distributions. The cisco client can be downloaded from the university | |
| − | |||
| − | |||
| − | |||
| − | |||
| − | |||
| − | |||
| − | |||
[[Mac Mavericks manual here]] | [[Mac Mavericks manual here]] | ||
| Line 71: | Line 64: | ||
If you have been locked out of the network, you can still change the password [https://password.wur.nl/ online] | If you have been locked out of the network, you can still change the password [https://password.wur.nl/ online] | ||
| + | |||
| + | == How to use VPN on OSX == | ||
| + | |||
| + | '''Be aware that you need a VPN approval from IT first!''' | ||
| + | |||
| + | (for more information on WUR VPN, go here : [https://www.intranet.wur.nl/nl/services/ict/klantenservice/FAQ/VPN/Pages/WUR-over-thuiswerken-vpn.aspx] ) | ||
| + | |||
| + | In your systems preferences panel go to network | ||
| + | |||
| + | Click on the + sign to add a new network type | ||
| + | |||
| + | Select VPN and Cisco IPSec | ||
| + | |||
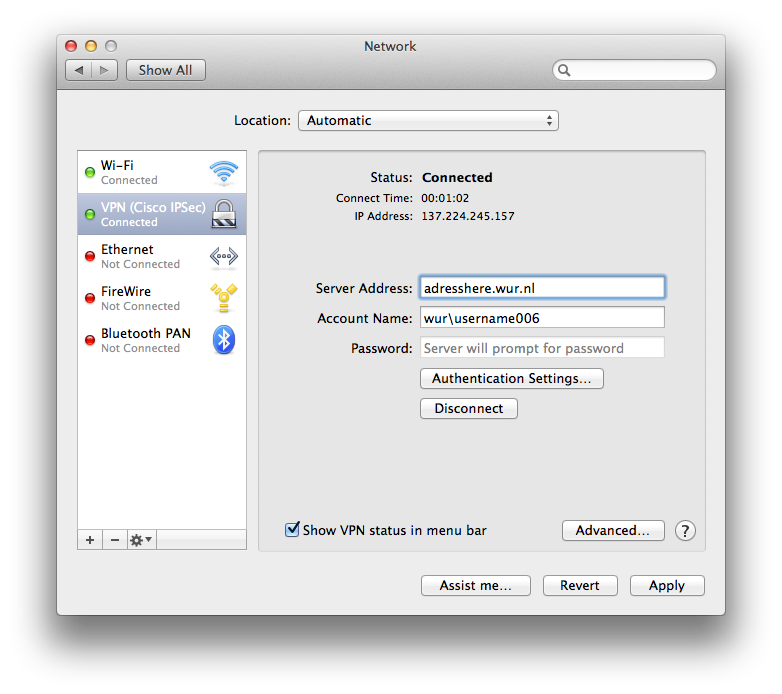
| + | After that you fill in the server address and your account name: | ||
| + | |||
| + | [[File:VPN WUR STEP 1.png]] | ||
| + | |||
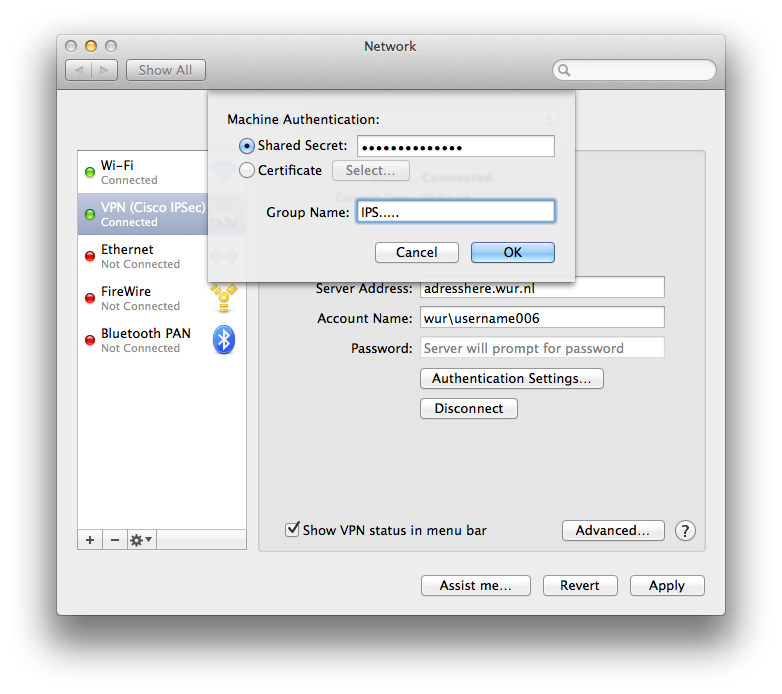
| + | In authentication settings: | ||
| + | |||
| + | [[File:VPN_WUR_STEP_2.png]] | ||
| + | |||
| + | Not everything is filled in due to security reasons, you have to go to the WUR intranet website and download the VPN information files ( [https://www.intranet.wur.nl/nl/services/ict/Documents/Downloads/VPN_Profile-WUR_PCF.zip VPN Profie WUR PCF] ) | ||
| + | |||
| + | When the file / folder is downloaded, open the WUR.pcf file and the host (url) can be found in here, the group name and the group password. | ||
| + | |||
| + | The shared secret ( enc_GroupPwd in the WUR.pcf file) needs to be decrypted via this website: | ||
| + | |||
| + | http://www.unix-ag.uni-kl.de/~massar/bin/cisco-decode | ||
| + | |||
| + | and then filled in. | ||
| + | |||
| + | Now if all settings are correct and you have permission from ICT you can now connect to the WUR network. | ||
| + | |||
| + | If you have any questions feel free to use the mailing list. | ||
Latest revision as of 17:40, 31 October 2018
Contents
Using the VPN
If you need access to your computer at the university: in the past, it was possible to get a public VLAN address for university computers, but now that no longer seems to be an option.
The recommended way to do so is to use VPN access. There are two clients for the VPN hardware in use at the university: a client from Cisco, and a native client called 'vpnc'. The native vpnc client is standard available in Debian Sid (apt-get install vpnc), I cannot say for other distributions. The cisco client can be downloaded from the university
the Cisco vpnclient
Note: this currently does not work with kernel 2.6!
- download the Linux client and the Profile from http://www.wur.nl/wurnet/deelprojecten/coax_vervanging_netwerkactualisering/index_vpn.html
- unpack the zip
- unpack the tgz
- run ./vpn_install
- run /etc/init.d/vpnclient_init start
- copy WUR.pcf from Profile zip file to /etc/CiscoSystemsVPNClient/Profiles/
- start with 'vpnclient connect WUR user blabl001' (blabl001 is your wur account)
the native vpnc
Note: recently vpnc stopped working
- unpack the tarball
- run 'make && make install'
- make a config file /etc/vpnc.conf containing:
Please note that these details have been removed at the request of FB-IT as they are part of the security policy of the WUR. Please do not reinstate these secrets without prior permission of the chief security officer.
IPSec gateway <removed at the request of FB-IT>
IPSec ID <removed at the request of FB-IT>
IPSec secret <removed at the request of FB-IT>
Xauth username <removed at the request of FB-IT>
Xauth password <removed at the request of FB-IT>
- beware, vpnc is very picky, you cannot have two spaces, or a tab, or any appending spaces or something like that in the file
- create the tun device ('mknod c 10 200 /dev/tun')
- modprobe tun
- start vpnc
- route add -net 10.0.0.0/8 dev tun
Using Citrix (Windows on Linux or OSX)
See Citrix
Changing Your Password
You can change your WURNET password with samba's client:
smbpasswd -r scomp0001.wurnet.nl -U annie0001
Passwords expire in 90 days - so make sure you reset it within that period. (Note: it is possible to keep your old password by running this command twice - setting it back the second run).
Example code:
echo -e "$preferred_password\n$temporary_password\n$temporary_password" | smbpasswd -s -r $server -U $user
echo -e "$temporary_password\n$preferred_password\n$preferred_password" | smbpasswd -s -r $server -U $user
If you have been locked out of the network, you can still change the password online
How to use VPN on OSX
Be aware that you need a VPN approval from IT first!
(for more information on WUR VPN, go here : [1] )
In your systems preferences panel go to network
Click on the + sign to add a new network type
Select VPN and Cisco IPSec
After that you fill in the server address and your account name:
In authentication settings:
Not everything is filled in due to security reasons, you have to go to the WUR intranet website and download the VPN information files ( VPN Profie WUR PCF )
When the file / folder is downloaded, open the WUR.pcf file and the host (url) can be found in here, the group name and the group password.
The shared secret ( enc_GroupPwd in the WUR.pcf file) needs to be decrypted via this website:
http://www.unix-ag.uni-kl.de/~massar/bin/cisco-decode
and then filled in.
Now if all settings are correct and you have permission from ICT you can now connect to the WUR network.
If you have any questions feel free to use the mailing list.

